learning to program…properly

I get by in programming via experimentation and google. However, there are times where I wish I knew how to program more ‘proper’. I’ve been wanting to learn how to make iphone apps for some time now so thanks to davey I’ve been watching a few tutorial videos on objective-c. Many start with the basics which can be quite tedious, but I suffer through them to make sure I don’t miss any crucial information. Today I learned exactly what break & continue mean in the context of a for loop. I had an idea previously but never bothered to look up the formal definition. So lets for instance look at this for loop:

for (int i = 1; i < 5000; i++){
    if (i == 101)
    break;
    printf("The index value is %i\n",i);
}
This loop is super simple: it prints the value of i until i==101 when it completely drops out of the loop. On the other hand we have:
for (int i = 1; i < 5000; i++){
    if (i % 5. == 0)
    continue;
    printf("The index value is %i\n",i);
}

which says that if the remainder of i/5 is equal to 0, then consider this specific loop iteration finished and move on to the next one without executing any of the code below. The % sign here is known as the modulus operator.

In summary:

break;    //DROPS OUT OF THE FOR LOOP COMPLETELY
continue; //COMPLETES CURRENT ITERATION AND MOVES ON TO THE NEXT

blob & KH tests again!

Turns out I was running my BLOB tests incorrectly by not telling gadget that the box size was not a cube. The periodic box was supposed to be x,y,z=[2000,2000,6000] but was simply registering as [2000,2000,2000]. Initially I didn’t think this would pose a problem since it was a periodic box, but I forgot to take into account the shockwaves propagating back into the initial blob and causing some unwanted disturbances. Anyway, by switching on three parameters in the makefile:

-DLONG_X=1.
-DLONG_Y=1.
-DLONG_Z=3.
I was able to easily fix this problem so the box was properly structured. After a day’s worth of testing I ended up with some nice results:
where we see that both DISPH cases do much better than the vanilla SPH case.
UPDATE(7/26/13)! Movie of a high-res blob test zoomed in on the blob:
In other news I made a longer KH instability movie, this time in 1080p!
these movies were created with ffmpeg, the settings to create a slightly smaller and ‘more compatible’ youtube file are as follows:
ffmpeg -r 12 -i splash_%04d.png -c:v libx264 -crf 1 -pix_fmt
yuv420p -r 30 output.mp4
where the -crf is the constant rate factor; a value of 0 is no compression where a value of 50 is maximum compression. The -pix_fmt command has something to do with downsampling. I got all of this from a forum post.

bash math!

In doing some Kelvin-Helmholtz comparisons I have been trying to cook up a script that can stitch two movies together with ffmpeg. In order to determine how many frames I need I must do a simple subtraction in bash, but how?! Easy apparently…you just:

#!/bin/bash
BEG=10
END=400
NUM=$((END-BEG))
echo $NUM

and it will return the value 390. So how about that ffmpeg script?!

#!/bin/bash

FPS=12

BEG=10
END=50

DIR1=.
DIR2=.

PREFIX1=splash\_%04d.png
PREFIX2=splash\_%04d.png

MOV1=1.mov
MOV2=2.mov
FINAL=SIDEBYSIDE.mov

NUM=$((END-BEG))

if [ $END -gt 0 ]
  then
  PARAM="-vframes $NUM"
  else
  PARAM=""
fi

ffmpeg -start\_number $BEG -r $FPS -i $DIR1/$PREFIX1 $PARAM -vcodec qtrle $MOV1
ffmpeg -start\_number $BEG -r $FPS -i $DIR2/$PREFIX2 $PARAM -vcodec qtrle $MOV2

## SIDE BY SIDE ##
ffmpeg -i $MOV2 -vf "movie=$MOV1 [in1]; [in]pad=iw\*2:ih:iw:0[in0]; [in0][in1] overlay=0:0 [out]" -vcodec qtrle $FINAL
Here’s the end result:

vanilla SPH vs DISPH so far….

I ran a systematic comparison between vanilla SPH and DISPH using our latest version of the code. I include all the fancy physics such as EZW winds (momentum+energy) at 150km/s & 75km/s, feedback with typeIa,AGB, etc etc.

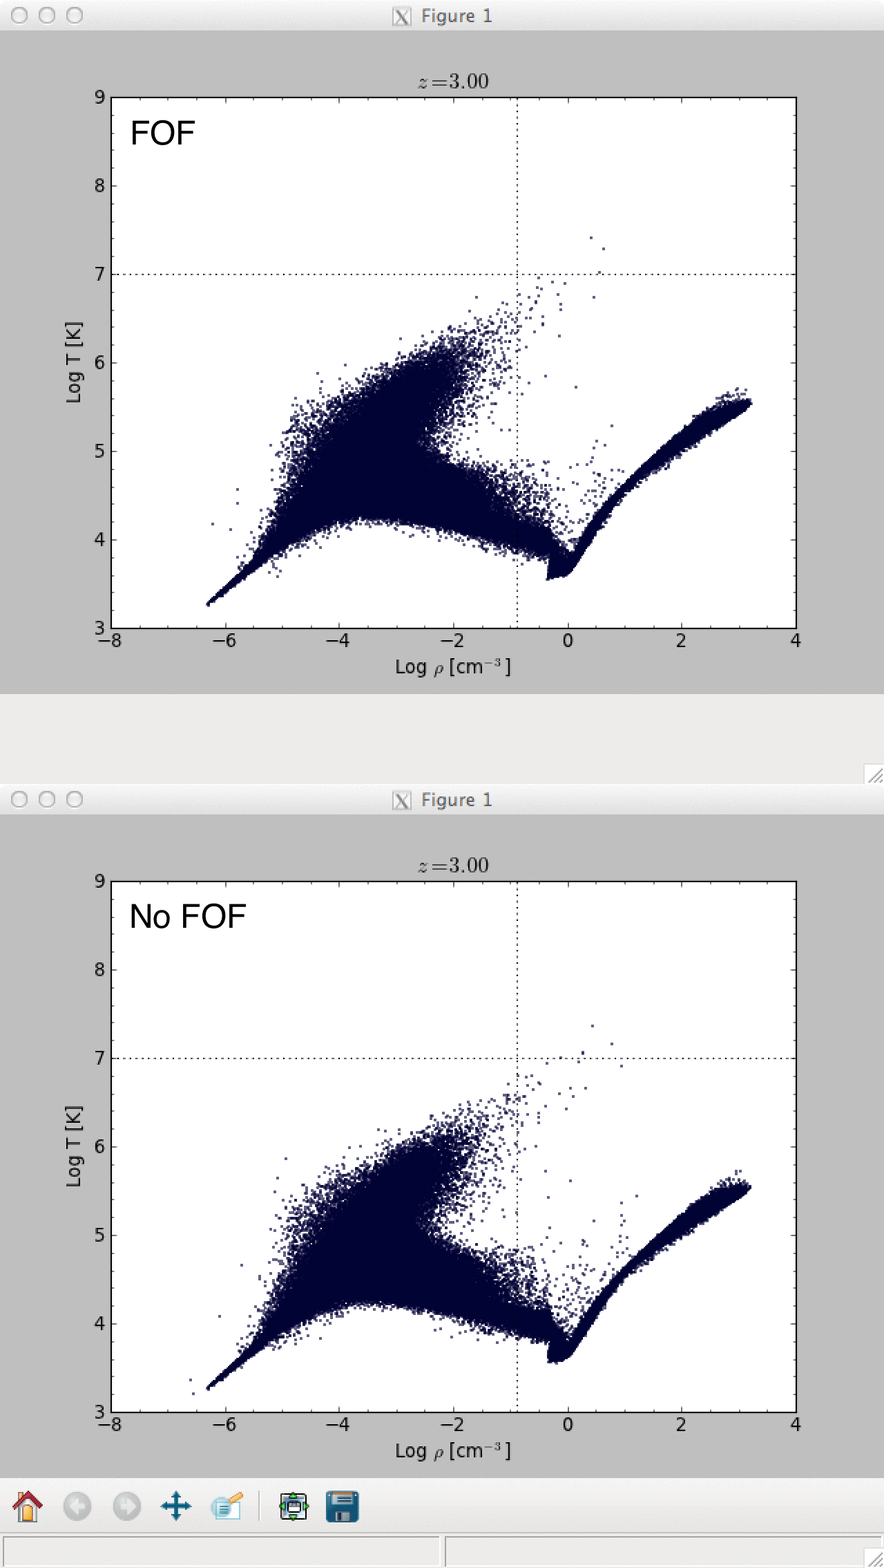
Let’s start with the phase differences:
PHASEDIAGRAM
SFRD:
SFRD
GSMF:
GSMF
m-Z relation:
mZrelation
fgas:
gasfraction
sSFR:
sSFR
HMR:
halfmassradius
timings:
timings
density fields:
densityfields

bounding box for text in matplotlib

More often than not nowadays I find myself having to add text to my figures. The problem that often arise is how do I make it stand out? Creating a bounding box for the text is not necessarily straight forward and I’m tired of searching for it:
text(-7.5,7.5,DIRS[i],bbox={'edgecolor':'k', 'facecolor':color[i],
'alpha':0.5})

h5py to replace npz?!

Apparently .npz files have a limit of ~4GB, which can be a problem when dealing with large datasets ($$600^3$$), so how do I write binary files of this size?! Looks like I need to migrate to HDF5…lol; here’s an example for read/write similar to npz:

import h5py
a = np.random.rand(1000,1000)
f = h5py.File('/tmp/myfile.hdf5')
f['a'] = a # <-- Save
f.close()

now that will write the file, lets open it

import h5py
f = h5py.File('/tmp/myfile.hdf5')
b = f['a']
#b = b[()]
f.keys() #shows all values in the dataset
f.close()

but the odd thing is, you can’t directly access the data here by just ‘b’. Instead there is a ton of information attached like b.shape, b.dtype, etc etc, all found here. Instead, you simply have to use the command

b.value

and that will output the data of the file.


head command + animated gifs

Date Category Tech
I consider myself pretty knowledgable in Linux…but I seem to be learning new commands and techniques quite often. Today I learned about *head* which essentially gives you the first few lines of a file and prints it on the screen. You can customize this experience by adding parameters, one of the more useful ones is -n # which as you would expect returns a specific number of lines from the beginning of your file. This is going to prove particularly useful when comparing .out files that contain compilation options. On Eureka for instance, I’ve found that
head -n145 something.out > textfile.txt
does a good job at capturing that.
Also had to make a quick animated gif today, easiest way I found was to use image magick via:
convert -delay 50 SH03_%d.tiff[0-1] animated_gif.gif
and the result is:
image0

VPN

Setting up a true VPN (and not just an SSH tunnel) on ubuntu isn’t exactly challenging, but took a little bit of dinkering around. The nice thing is that it works wel and will make things a bit easier when it comes to changing settings while sitting outside of my network, while ‘pretending’ I am inside of my network! I simply followed the straight forward instructions here.


circumpolar sun

It’s pretty amazing to see this at 3am somewhere over north eastern Canada. The sun is always shining up here during the winter months; lets hear it for circumpolar stars!

20130623-004553.jpg


auto-login followed by auto-lock

I’m heading away for a while and will need continued access to my server. Usually that means via ssh, but occasionally I have to VNC into the machine. The problem is - if the server goes down for any reason, when it comes back up the VNC server does not start until I login. So is there a way to set automatic login and lock the screen at the same time? Yes! This is linux, of course there is! Simply create a new file

/home/USERNAME/.config/autostart/screen_lock.desktop

and add the contents

[Desktop Entry] Type=Application Name=Lock Screen Exec=gnome-screensaver-command -l

and that was that, works like a charm. Courtesy of AskUbuntu.